
Email: nadege.preston@hotmail.com
Total Article : 82
About Me:Hi I’m Nadege and I study French at the University of Leeds, and I have just completed my third year abroad in Montpellier studying literature and enjoying the sunshine! I love art; painting and being creative, as well as photography and baking. Travelling is my favourite hobby at the moment; experiencing the French language and culture. I hope you enjoy reading some of my articles!
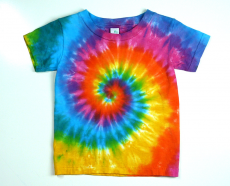
As spring and summer nears, what better way to transform old winter clothes into new, colourful creations than with tie-dye! Learn how to create amazing tie-dye projects for clothes, home décor (cushions, tablecloths etc) or for gifts.
Before you start it is important that you have permission to use tie-dye as it can be a very messy craft! Additionally, when using dyes it is necessary that your work surface area is well protected with newspaper for example, and that you always wear rubber gloves to protect your skin from irritation. Also to be safe, wear an apron or old clothes!
Firstly, there are two main ways in which tie-dye can be used; either by applying the dye from a bottle directly onto the fabric, or by submerging the fabric into the dye. I would recommend that for one colour tie-dye projects, the submersion method is best, but when using more than one colour, it is best to apply the dye straight from the bottle.
You will need a tie-dye kit which are widely available in almost any art and craft shop.
What you will need:
-The tie-dye colours given in the kit; you should be given dye and clear bottles, or dye already in bottles, to which you will add 500ml of water
-250g of salt
-A large plastic bowl
-Rubber gloves
-Elastic bands
-Fabric (best on white cotton)
-A small amount of soap
-A large plastic bag (for the bottle method only)
Step by step instructions for the tie-dye submersion method:
-Wash the fabric in water and soap, then wring.
-Whilst the fabric is damp, using rubber gloves dissolve the coloured dye in 500ml of warm water.
-Then fill the large plastic bowl with warm water (around 6 litres).
-Add the 250g of salt to the warm water.
-Add the dye solution and stir well.
-Add elastic bands onto the fabric, about one inch apart (see designs below).
-Soak the fabric in the mixture, and leave for 45 minutes, stirring every now and then.
-Without untying the fabric rinse well in clean water and the water from the fabric should be clear.
-Hang outside to dry.
-Make sure you wash the item separately for the first few washes.
Instructions for the bottle method:
-Using rubber gloves, dissolve the tie-dye colours each in 500ml of water.
-Place the tied fabric (see designs below) in the large plastic bowl, and apply the dye solution from the bottle onto the chosen areas.
-Put the fabric in a plastic bag, and leave overnight.
-Without untying the fabric, rinse well in clean water and then untie and clean in warm water.
-Hang up the fabric and leave to dry away from direct sunlight.
-Make sure you wash the item separately for the first few washes.
Designs:
Stripes: From the wide edge of the fabric, form concertina pleats (parallel pleats with alternating raised and recessed folds), then tie with elastic bands with around 1inch gaps.
Circles: Lay the fabric flat, and pinch the centre of the fabric, pull into a cone shape and then tie with an elastic band. Tie other elastic bands from the top down, to the end of the fabric.
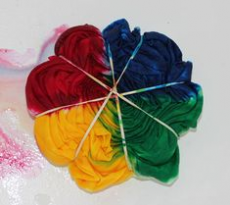
Spiral: Like the circle design, pinch the centre of the fabric, but this time twist the fabric while holding the centre and the fabric should create a spiral shape. Once all the fabric is in this spiral shape, use elastic bands to hold the spiral in place, making sure they intersect at the centre. (see IMAGE 2)
Overlapping small circles: Use a piece of chalk and draw dots along the fabric, in a large circle or a design of your choice. Pick up each dot and put each fold of fabric in one hand. Once you have picked up all the dots, and have the fabric in one hand, tie an elastic band about 1 inch from the top. Continue to tie elastic bands from the top down.
Finally, I hope you love your tie-dye creation!
IMAGE 1 URL
https://img1.etsystatic.com/005/0/6268189/il_fullxfull.392196953_3hda.jpg
IMAGE 2 URL
https://s-media-cache-ak0.pinimg.com/236x/18/3b/de/183bdede9eb648031bc638d6a464f470.jpg

0 Comment:
Be the first one to comment on this article.