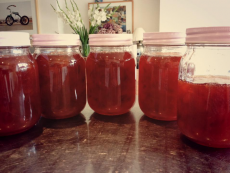
I have a plum tree in my garden which over the last month has given me masses of beautiful fruit. I hated to think of it all going to waste, so I decided to try making jam. Armed with some top tips from my grandmothers and a lot of sugar, I got to work. Jam making is different from other forms of cooking in that it requires some special equipment. Here is what you will need.
Equipment:
6 large (500ml) jars
The biggest saucepan you can find (if you can’t fit all 6 jars in there, split the recipe into two batches)
A sugar thermometer (optional but recommended) or saucer
A wooden spoon
A ladle
A chopping board and small sharp knife
Small saucepan
Ingredients:
1.5kg stoned and chopped plums (do this with a friend – it takes a long time)
1.5kg sugar
½ cup Certo or other source of pectin
1 teaspoon butter
250ml water
Method:
1. Once you have stoned your plums and chopped them depending on how chunky you want your jam to be, put them in your saucepan with the water. Bring to the boil, then turn down the heat and simmer for 40 minutes until the pot is full of delicious juice, stirring occasionally.
2. Put jar lids in a small saucepan and boil for 20 minutes. Put jars on a baking tray in the oven at 180°C for the same amount of time. This will sterilise them and stop your jam going off.
3. Add sugar, stirring until it has fully dissolved. Bring to a boil and add the Certo. This will help the jam set. Stir the butter in to reduce the amount of froth on the surface of the jam.
4. Keep boiling until your thermometer shows that the jam has reached setting point of 105°C. If you don’t have a sugar thermometer, put a little jam on a saucer and put in the fridge. If once cool the jam wrinkles when you push it with a finger, then it has reached setting point.
5. Take the pan off the heat for 5 minutes while you get your jars ready to be filled. This can be messy so protect your surfaces.
6. Ladle the jam into the jars – it should be liquid at this stage and very hot! Place the lids on top and screw them on as much as possible without burning yourself. When they have cooled some more screw the lids on further until they are tight. Wipe any spills off the outside of the jars.
Store in a cool place, out of direct sunlight. Once open, keep in the fridge.
This recipe is one I will be using again and again! It is also great for gifts – if you use a decorative jar topper and a label to dress up your jars, you can give them away to friends and family!
Image credit: Amy Wheller

0 Comment:
Be the first one to comment on this article.