Going out and flying a kite has long been a popular pastime, particularly in the UK, and while this tradition may not be as popular now as in the past, it might be a fun idea for a day with family or friends, without a high cost. In fact, kites don’t have to be big, expensive and hard to make. The smallest recorded kite, which was shown to fly, was only 5mm in height. On the other end of the scale, the largest is 1034m long. Flying kites can be exciting, and is a useful skill to know, improving your hand-eye coordination just as modern day video games claim to do. There are also plenty of competitions around the world involving flying kites, where kite flyers compete for speed, height and power. Equally, kites have been a popular part of many artistic and cultural movements. During the cultural revolution of China in the 1960s and 1970s, the use of kites was banned, and came with a prison sentence of up to 3 years.
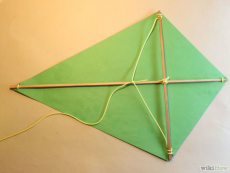
Making a kite is actually not that hard. All you’ll need is some paper, some wooden sticks and some string. First take a rectangular piece of paper. The bigger the paper the better. If you don’t have anything bigger than A4, then tape 4 A4 pieces together into a bigger rectangle, but make sure they are held securely. Next cut the paper into a diamond shape, making sure to keep it symmetrical along the centre line. Next take your two sticks - barbecue skewers work quite well. One stick should measure the width of the diamond, and the other the length. Tie them together with some of the string. It should be as tight as possible, so that neither of the sticks can move or twist out of place. Then finish this with a knot. Next tie the sticks to the paper, piercing two holes at each corner and pulling string through them before knotting it around the sticks. Tie a length of string securely between the two ends of the horizontal stick, so that the ends of the string do not slide along this stick. Finally tie the rest of the string, which should be quite long (at least 100m) to the centre of this horizontal piece of string. You can now go and fly your kite, using this final long piece of string to hold it as you fly. You can also add decorative ribbons to the corners of your kite with some glue or a stapler if you so desire.
This style of kite can also be made using a variety of other materials, and will be more durable if made from a large plastic bag, such as a black bin bag. In general, the more securely attached the elements of your kite are the better, as this will mean that you will be able to use your kite for longer without fixing it or making a new one. Also, using a bin bag can be easier than paper if you cannot find large pieces of paper, because of their much bigger size. There are also plenty of other types of kites that you can make from home, each with their own strengths, such as a Delta Kite or an Eddy Kite. It’s a lot more fun to make kites than to simply buy them, though if you get really into kiting, eventually you may want to invest in one. However, for all first time kiters, I really recommend making your own, because you’ll get to know a lot better what it is that makes the kite work and how it can be improved.
For more information on flying your diamond kite, read my next article, which will tell you everything you need to know to get your kite in the air!
Image from: http://pad3.whstatic.com/images/thumb/5/5f/Make-a-Kite-Step-5-Version-2.jpg/670px-Make-a-Kite-Step-5-Version-2.jpg

0 Comment:
Be the first one to comment on this article.