
Email: ZYVC057@live.rhul.ac.uk
Total Article : 213
About Me:I'm a graduate student studying International Criminal Law and first started writing for King's News almost 4 years ago! My hobbies include reading, travelling and charity work. I cover many categories but my favourite articles to write are about mysteries of the ancient world, interesting places to visit, the Italian language and animals!
Want to surprise your mum with a beautiful gift? Or are you looking for somewhere to store your earrings and bracelets? Either way you will enjoy designing and decorating your own jewellery box made with one of the most simple of materials: craft sticks.
What you’ll need:
- Many, many craft sticks. It would take you quite some time to eat enough ice lollies to get the right amount of craft sticks for this project so it’s best to buy a pack of 400-500 to be safe!
- Glue
- Paintbrushes and water oil paint
- Felt tips
- Any decorative features such as tiny diamantes, buttons, beads, glitter or even ribbons and pompoms for originality and flavour!
- Wooden craft knobs (don’t worry too much if you can’t find these).
What to do:
Step 1: Paint the craft sticks individually – it is much easier to paint them before you glue them together. If you already have a set design in mind which involves different colours and patterns then estimate how many craft sticks you will need of each colour and paint them, make sure you consider how big and how tall you would like your jewellery box to be whilst also keeping in mind how many craft sticks you have.
Step 2: Now that all the craft sticks have been coloured it’s time to make the bottom of your jewellery box. In order to do this place 12 craft sticks on your desk, make sure they are sitting evenly so all no craft sticks poke out. Next, put glue on one side of a different craft stick and place it perpendicular on top of the row of 12 ticks, make sure it is on one of the edges where it can cover all 12 sticks. By doing this you are literally gluing all the sticks together. Follow the same procedure and glue another craft stick to the other side of the row of sticks. This means that now the first 12 sticks which sat vertically have each of their ends covered by a craft stick which sits horizontally, tying the sticks together. Repeat this step from the beginning to form the lid of the box.
Step 3: Now that your base and your lid are finished we can shift our attention to building the sides of the boxes. To do this place some glue on both ends of two different craft sticks. Put these two, with their glue side facing downwards, onto the base of the box so that the ends of these two can lay on the ends of the other two craft sticks you glued on the base.
Step 4: Dab another bit of glue on the ends of another two craft sticks and place them so the glue is facing downwards on the ends of the two craft sticks you just glued on. Repeat this procedure until the box reaches the height you like.
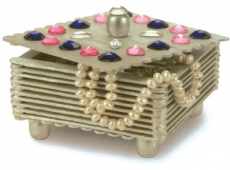
Step 5: Now that the walls of your box have been built and can be placed on and off the box as desired, you can attach four craft knobs to either corner of the base of the box for decorations. Also, you can add any other patterns or designs on the box by using more water-based paint or some felt tips. Why not add some glitter, beads, buttons or diamantes for that extra touch and voila’ your jewellery box is now complete!
Image: http://s.hswstatic.com/gif/craft-stick-projects-5a.jpg

0 Comment:
Be the first one to comment on this article.