
Email: ZYVC057@live.rhul.ac.uk
Total Article : 213
About Me:I'm a graduate student studying International Criminal Law and first started writing for King's News almost 4 years ago! My hobbies include reading, travelling and charity work. I cover many categories but my favourite articles to write are about mysteries of the ancient world, interesting places to visit, the Italian language and animals!
This simple yet vibrant experiment will have you staring with amazement as you witness one of the most beautiful and colourful chemical reactions science has to offer! Not only is this experiment quick and fun but you can also conduct it in the comfort of your own home – so if you’re in search of something fun to do this afternoon look no further and prepare to play the role of a scientist for the day as you create a true masterpiece!
What you’ll need:
In order to carry out the experiment there are just a few things you’ll need, most of which you can already find lying around the house!
- A plate or bowl, the wider the better!
- Anywhere from half a cup to a cup of milk, depending on how much your mum will let you have that is!
- A small drop of washing up liquid
- Some food colouring, you may find this around the house but if not plan the experiment a few days ahead. This way you can choose the colours you’d like for the experiment!
- Toothpicks, cotton buds or chop sticks if you want to mix the colours later on in the experiment, this one is optional but once you have the experiment in front of you it’s hard to resist mixing!
What to do:
So now you have all the appropriate equipment here’s what to do!
STEP 1 – Pour the milk into the bowl/plate, make sure there is enough milk to cover the base of the container. Try sure not to spill any but, if you do, don’t cry over sour milk!
STEP 2 - Add a few drops of food colouring to the milk, you can even try mixing the food colouring together in a separate bowl first to make a brand new colour. For example, if you have yellow and blue food colouring mix them to make green so you now have three colours for the experiment! Why not do the experiment with a friend and see who can make the most colours using three different food colourings!
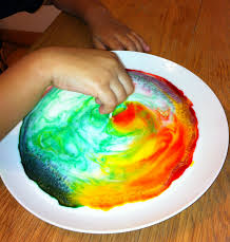
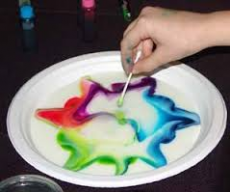
STEP 3 – Add a drop of fairy liquid, or any washing up liquid, sit back and watch the magic! Once the colours start to spread away from the liquid, due to a chemical reaction, you can start mixing them with your toothpick and create your very own work of art! The colours swirl around in the bowl for quite some time until, eventually, they sink to the bottom; make sure you remember to take a photo so you can show your friends before the chemical reaction dies down!
What has happened?
The experiment is an explosion of beautiful colours, but what has actually happened and how is it possible?
Milk is not only nice with cereal and heavenly with a cup of tea, but it is also really good for you! It consists of mainly water but it also contains minerals, proteins, vitamins and small droplets of fat, which is why new born babies need lots of milk! The proteins and fat contained in the milk are highly sensitive to any alterations, which is why when you add the washing up liquid to the milk it causes a chemical reaction. A chemical reaction, by the way, is a chemical transformation in which the molecular or ionic structure of a substance is changed and rearranged. The fat of the milk and the washing up liquid are reluctant to join together and this causes the movement you saw in the plate, food colouring is what allows us to see this movement as it happens! If you haven’t already tried this experiment then start gathering the equipment for it and, if you have, then try it again – each and every time you’ll create a new artistic masterpiece and know the science behind the art!
*This experiment can be conducted by anyone over the age of three and the young scientist in the making should always be assisted by an adult!
IMAGE 1: http://2.bp.blogspot.com/-29d3d2t-iQ8/UBr33bL74zI/AAAAAAAAAqc/iDr4jYVXJPI/s1600/IMG_2043.jpg
Image 2: http://1.bp.blogspot.com/_FMyEiWIhorY/TGVM0YtsAjI/AAAAAAAAAAk/haTFQOTkMxY/s320/doc4b8ebfaae50cd3414636333.jpg
0 Comment:
Be the first one to comment on this article.