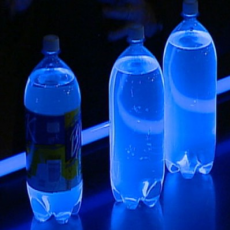
Ever thought that water is a bit plain? Refreshing and very good for you but just a bit, well, seethrough. What if I told you how to make it glow? Cool? I know right, so let's get started!
You won't need much for this experiment, but a black light and tonic water are essential for this. If you don't have one you can find a black light from the internet or in most department stores. You don't have to use tonic water, regular water works also, but slightly differently. If you're using ordinary water then you will also need a highlighter, this is important or there will be no glowing. The instructions for this experiment couldn't be much simpler. If you're using ordinary water, break the highlighter apart and remove the felt before then soaking it in the water for a few minutes. If you're using tonic water then you don't need to do this. Once that's done you'll need to go to a dark room; turn the light off, close the curtains, whatever you do it must be very dark for this to work properly. Next just switch on your black light and you will find that the water glows flourescently! How cool is that?! The only thing is this may put you off of drinking tonic water, don't let it.
So the experiment itself is very simple, but what about the Science behind it? Why does it glow? Well black light is UV (Ultra Violet) light, something you may be familiar with if you've studied the electromagnetic spectrum in Physics. Effectively it contains radiation and reacts with the phosphors to create the glowing effect. A black light lamp emits a UV light that can illuminate objects and materials that contain phosphors. These Phosphors are luminescencent (they light up/glow) when encouraged by radiation. The water glowed when exposed to the black light (UV light) because it contained phosphors. If you decided to use the ordinary water and a highlighter pen then the UV light reacted with phosphors in the dye of the highlighter felt instead. If you used tonic water then the UV light reacted with phosphors in a chemical used in tonic water called quinine.
There are actually different categories of luminescence. Different chemicals have different reactions and as a result they glow at different times with exposure to different light sources or materials. One category, fluorescence, will glow when exposed to a black light or UV light and this was the type used in the experiment just described. Another is phosphorescence. This is very similar to flourescence except that it can continue to glow after the black light has been switched off for some time as long as it is still in darkness. It will fade once exposed to sunlight and of course would be harder to see glowing anyway. Chemiluminescence is yet another type and provides the kind of lasting glow that you find in glowsticks, often sold at Winter events. Notice how when you have a glowstick you have to crack it by bending it a little to make it glow? This is because you are cracking the element inside which then produces the glow automatically because the middle of the glowstick has raidoactive light in it which creates the glow once the element is released. Note that you can maintain the glow with Chemiluminescence by freezing it too and snapping the element back into life once again. Fascinating isn't it, look out for it next time you see someone turn a glowstick on! Finallly bioluminescence is a source that originates from living organisms as the name suggests. This means any creatures that create a glow such as Jellyfish or a Firefly. It creates some radiation and is usually a function that animals who live in dark areas have developed. Many deep see fish can 'glow' for example.
I hope you enjoyed learning about how things glow, in particular water! It just goes to show how fun Science can really be!
IMAGE: http://www.stevespanglerscience.com/blog/wp-content/uploads/2012/10/2010120200-glowing-tonic-geyser-101707-tonicglow-5-400x400.jpg
0 Comment:
Be the first one to comment on this article.